CourseLogV2
 CourseLogV2
 This
is CourseLogV2, an EWE application that runs under Windows Mobile
2005, WM 6 using your GPS receiver to tell you where you are, how
long and how far you go and where you have been. This version 2
provides a great improvement : it displays your position on a map.
You can insert as many maps as your device can handle, provided each
one is small enough to be handled in memory. The software uses a
concept of calibrated "tiled maps", only a set of tiles is
in memory at a time and switching between tiles is automatic.
This
is CourseLogV2, an EWE application that runs under Windows Mobile
2005, WM 6 using your GPS receiver to tell you where you are, how
long and how far you go and where you have been. This version 2
provides a great improvement : it displays your position on a map.
You can insert as many maps as your device can handle, provided each
one is small enough to be handled in memory. The software uses a
concept of calibrated "tiled maps", only a set of tiles is
in memory at a time and switching between tiles is automatic.
The software also displays your track on the map and you can set waypoints to check your direction, distance, time to arrival. You can also re-use your track as waypoints and even reverse it so that you can find your way back ;-))
Note : if, by chance, you have been using the version 1 of this software (without map), please switch to V2. I will no longer support version 1 because of too many bugs. Version 2 has all features of version 1.
|
... |
|
|
2.0.3 |
Just a modification of the maps
display : Now they appear sorted so that those which fit best with
current scale appear on top. |
|
2.0.2 |
First release for general use. Hopefully it is usable without to many problems. |
First CourseLog is a freeware, open source (see CPL down) programmed in java on a specific virtual machine name "ewe". The virtual machine is freeware too so there is no licence fee required to use CourseLog. You need a GPS receiver connected to your Windows Mobile device. This is usually done using a serial port (COM6: on my QTEK 9100), possibly mapping a Bluetooth connection to a serial port using Windows pocket Bluetooth . If you have a device with a builtin GPS receiver, it should also be mapped to a serial port so that you can access it. CourseLogV2 reads in NMEA sentences to determine your position.
Second, you need a
map to display your position on. I personally use several sources
such as
http://maps.google.com
http://www.geoportail.fr
(french maps)
(if you know about
other sources, send me links)
These web sites provides only pictures coded as bitmaps without any associated geographic information. If you want to use that picture to locate yourself, you need to give the software some points to use as references. This is done by providing a small text file with longitude and latitude values, associated to (x,y) positions on the picture. You need only 2 points per picture.
Please refer to section How to generate a calibrated map? to see how this is done in practice.
Note that the software provides several tools to ease calibration.
You need to agree the license and disclaimer agreement (end of this page). This does not mean you have to sign something but installing the software implies you accept this license.
This application is fully based on the EWE virtual machine (free java for many mobile systems). Look at the http://www.ewesoft.com web site.
Note : A new version of the virtual machine has been issued (called EVE) Please click to the link Go here to access the old Ewe Virtual Machine because this is the machine you need to run CourseLogV2.
You must install the ewe runtime on your device before running CourseLog.
For that, the easier way is to unzip the file Download/Ewe149-CAB-PocketPC2003.zip on your PC, upload the cab file on your device and run it.
Because the ewe virtual machine needs to register its dll (ewe.dll) you have to run ewe on your device once.
For CourseLogV2 application, you have to download the CourseLogV2.exe file in a CourseLogV2 directory you can create on your device and then just click on the exe file. If you previously ran the ewe.exe file after the installation of the cab file, it should run. Otherwise it tells you “did not find ewe.dll”.
It will start with default values and display the "options" panel to let you select your serial port, maps directory, track file name, accuracy and units..
That’s all!
This is easier, just download the static linked version of CourseLogV2 (Download/x86-Win32-StaticLinked/CourseLogV2.exe)
But don't forget to place the ewe dll in the directory (Download/ewex_registry.dll)
Then start the exe file and it should work. By the way, I never tried to use a GPS connected to a PC. Tell me if it works!
The source, class files and (easier) ewe file are also provided. in the download section.
You can generate a target using the JEWEL tool for your own target. See the EWESOFT web site to get the tools and use them.
This will probably
be the first thing you'll need to do to use CourseLogV2. Generating
the text file by hand is not an option unless you like tedious
tasks!
Nevertheless, you have to understand the general use of the
software to do your first calibration.
2 possibilities are
proposed.
Specify
known reference points on the calibrated map.
Match
points with a .kml file generated from google earth.
You can
do those calibrations on your pocket device but it is generally more
convinient to use a PC connected to the web because most of the
pictures and data are available from the web. For that purpose, you
can use the Windows
version of CourseLogV2 which behaves almost exactly the same as
the WM version.
But first you need to understand the
calibration concept.
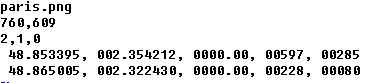
As explained above, a calibrated map is a pair of files :
|
A picture file paris.png |
|
|
A text file paris.mpr (Map Points of Reference) |
|
The relationship between the 2 files is that :
they are placed into the same directory
one has extension ".mpr" and it contains the name of the picture file, which is recommended to be the same with the proper extension. (Please note that the program only handles png and jpg picture files).
The file with
extension ".mpr"
provides the position of points (called "reference points")
on the picture.
Note : For those
who want details, here follows a detailed description. For the
others, you can skip this and go to the 2 proposed ways of
calibrating.
As can be seen in
the example above, the picture is a google map capture of Paris
downtown.
Picture format can be jpg
or png but it seems that jpg are often lighter.
The
"Map Points of Reference"
file provides :
the picture file name (supposed to be in the same directory)
the picture size in pixels (width, heigth)
the number of reference points and the used reference points (number, first reference, second reference)
A list of reference points (latitude, longitude, altitude, X in picture, Y in picture)
This is the case where you know the
latitudes and longitudes of 2 points on the map.
You have
to click the location on the map and you get a dialog asking you to
enter the latitude and longitude.
As a minimum you need to define
2 reference points on the image. You can define more but the software
will select the 2 points that generate the smaller distance to the
definition of the others.
Here is a sequence showing calibration
of the Paris corner which has been selected, assuming you know that
'Place de la Concorde" has coordinates (48° 51' 12" N,
2° 21' 15"E) and that the "île de la cité"
northern bridge has coordinates (48° 51' 54"N, 2°
19' 21"E).
First you have to click on the "Place
de la Concorde", you get the following window :
-
Type
in the coordinates
and
click OK.
You get a light blue cross at the clicked place. The
reference point is recorded. Then
you click the second place and enter the second set of coordinates :
Then
you click the second place and enter the second set of coordinates :

Now
your map has 2 reference points. It is calibrated.
What
you have to do is to save it by selecting Actions/Save Image
This
will create the ".mpr" file and your map is
calibrated.
You may also have the map and try to calibrate it by
noting your position. In such case, you have to go to one place,
start the calibration and select "current GPS position"
after clicking on the map on where you think you are.
After that
you have to save the calibrated map. Even if only one
reference point is identified, the map should be saved. It is not
usable with a single point but it needs to saved before you go to
another location and create a second reference point.
You have to
save again the map and it will be calibrated.
This is (in my opinion) the easiest
way to calibrate a map which has been captured and does not display
accurate longitudes and latitudes.
The principle is to select
locations on the map that you are able to retrieve on Google earth.
This means that you do it on you PC because you have a fully
functional GoogleEarth and also CourseLog windows executable version
running on it.
The sequence is the following :
You have to define points on the map in a given order.
Then you have to define a path in Google Earth, the path consisting in the same points in the same order.
You generate a ".kml" file by saving your path with that format.
Back to courselog, you select the action Actions>Import KML path . Courselog asks for a confirmation because this will erase the coordinates that were entered at step 1.
The coordinates are replaced and you can check if they are valid by selecting Actions>Find Ref. The red crosses should be close to the blue ones if you entered the points correctly
Here below is a description on how-to use a kml file and you can also take a look at the video which shows the full demonstration.
Reusing the previous example map, here is an illustration :
Select
points on the map in the calibration panel.
Proceed like the case
where you know the reference points but you are not supposed to
enter any consistent data in the location coordinates dialog. Enter
0 and 0 as latitude and longitude.
The 2 points are again Place
de la Concorde and the bridge to ile Saint Louis.
|
|
|
Define
the path between the points in GoogleEarth
You can see on figure
below that there is an orange path named "paris" between
Place de la Concorde and Ile Saint Louis.
Save
your path in a kml file
Do a right-click on the path and select
"Save As". Take care to save the path in kml format and
not kmz which is a zipped version.
Import
kml in CourseLog
Select the action in the menu Action>Import
KML file
Check
calibration
The calibration process consists in selecting 2
reference points among those which are specified by the user and the
criteria is to take the 2 which minimise the distance between the
computed positions and the known positions.
The action "Find
Ref." displays the entered points in blue and the computed
ones in red.
Here are the example results :
|
|
|
CourseLogV2 is organised into panels with 2 bottom buttons which can be accessed with the left and right soft keys
|
|
|
The left key
is equivalent to a click on the GOTO button, the right on the RESET
button.
When clicking the GOTO button, you can switch to the other
panels. The right button is dedicated to local actions.
Almost all
actions can be taken using keys but this is sometimes
tricky.
Attention : If the
application is closed, its state (current panel, options settings,
log state, track points and waypoints) are saved in the
"courselog.ini"
file.
If there is any error when application launches, remove
"courselog.ini"
file in the directory where CourseLogV2.exe is placed and launch it
again. It will start with its default status.

The
options which can be specified are :
The serial com port to connect to the GPS. Press on the Select GPS port button to open the port dialog.
 This
dialog allows you to select the GPS port, the baud rate and all
options. Click on the Update Ports
button to let the application scan which ports are available.
This
dialog allows you to select the GPS port, the baud rate and all
options. Click on the Update Ports
button to let the application scan which ports are available.
The minimum distance between logged points is specified between 2 km and 5 m. See "Minimum distance, a sensitive option" to get details on that option.
The Units are for those who go from nautical to terrestrial activities. I did not implement other non-metric units, sorry.
The Log : option gives the path name of the file which gets the record of your positions. Click on the file icon on the right to select a file on your system.
The Maps : option allows you to select a directory where the calibrated maps are located. Those maps are displayed in the Navigate panel.
When clicking on
RESET, all values are reset to default values. Otherwise those
selected values are saved in the courselog.ini
file in the same directory than the executable file.
The file is
generated automatically when leaving the application.
Note
: It is advisable to leave and re-enter the application when options
are modified so that they are saved.
|
|
|
|
The
Calibrate panel appears empty unless you have already opened a
picture.
First thing to do is click the Actions
button and select Open image
to open a picture file to calibrate.
If you open the file
paris.png, then the panel
will appear as on the right.
On a picture, you can do several
actions :
|
pan |
Drag on the screen and the picture will move. When you release the pen, the edges of the pictures are updated. Arrows also move the picture. You can not pan when an edge of the picture is at the edge of the screen. |
|
zoom |
press <Enter> to zoom in, long press or double press on <Enter> to zoom out. Select Actions/Rescale 1 to come back to a scale of 1. |
|
Select |
If you click on a point on the screen (without dragging), you can specify a reference point at the place you clicked. If you double press <Enter> or quickly press <Enter> then <Down>, this corresponds to clicking in the middle of the screen. |
|
Actions/Find Ref. |
This action
allows you to test your calibration quality. See How
to generate calibrated maps? |
|
Actions/Tile |
Divides the current picture into tiles. This can be done only after calibration. Sub-pictures are produced with names derived from the original image and indexes (row,column) appended. Those tiles are lighter to handle by the device. This is also useful when doing calibration on a PC and using the maps on a mobile device. |
|
Actions/Import KML path |
Complete
calibration by using kml content to specify the location of
reference points. See How to generate
calibrated maps? |
|
Actions/Open image |
Opens a picture file and the associated ".mpr" file if any. The reference points are displayed on the map is the mpr file is found. |
|
Actions/Save image |
Saves the ".mpr" file with the reference points values. The image file is not touched, only the "Maps Points of Reference" file is changed with the registered values. |
|
|
|
|
|
The distance panel allows you to start and stop logging your position. It also gives your coordinates (Lat:, Lon :), the GPS time (UTC) and the status of the GPS receiver.
If the color of the satellite is dark red, there is no GPS connection. You may have to test your settings in the options panel.
If the color is orange, the GPS receiver provides correct output but the position is not yet acquired.
If the color is green, your position isthe one obtained from the GPS receiver.
When pressing the
"Record"
button, you can change the status of the logging process. If you
record, the time, distance, upwards and downwards values are reset
and the log starts. The log elements are placed (appended) in the log
file specified in the options panel.
If Pause
is selected, the log is suspended and time and distance are no longer
incremented.
if Hold
is selected, the log is suspended too but it will restart from the
place and time it was suspend. It just decreases the number of points
in the log.
The details of the records in the log file are
listed in the log file section.
The details
of the displayed values are in section What does
the distance panel display.

Log
files are csv formatted. This is very simple but not very robust so
most applications use xml files. With this panel, you can convert to
GPX or KML formats.
Just click the Convert
button to get your xml file. Of course, it works faster on the PC
version.
See details in the conversion section.
|
|
|
|
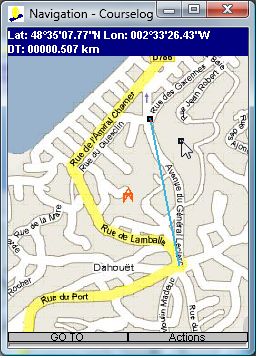
The navigation panel is the panel which displays your current position on the maps.
This panel uses a simple concept which I named "tiled map". The total map is made of a set of maps and only visible maps are displayed. The background image is built by drawing the images in the maps directory (see Options panel) which are used like tiles. Because they are calibrated, they should join automatically to provide a continuous background. The maps are displayed in an order according to their scale. The maps having the larger scale (larger number of meters per pixel) are in the background and the more detailed maps appear on the foreground. If the underlying map is too small or too big, it is not displayed. Only maps having a scale which is less than 20 times larger and more than 20 times smaller than the current zoom level are displayed.
Using this management of maps, the navigation requires less memory than if you use a single image. When you navigate on maps and they are no longer displayed, they are flushed from memory so you should be able to navigate without getting out of memory space. so you can put as many calibrated map as you wan in the maps directory. Maps with a smaller scale will only be used when you are in the area, so you can adapt the scale to the level of details you need.
Your position is displayed with the red symbol that also shows your average direction. This direction is the average heading on the distance panel.
When touching the screen at any location, you will enter a waypoint unless they are locked. Please refer to the How to use waypoints section for details on waypoints.
The actions on the navigate panel are :
|
Rescale 1 |
Rescale the map to 1. The reference scale is the one at the center of the map. It corresponds to scale one for the calibrated map which is under your current position. |
|
Reload |
Reload the calibrated maps directory. This allows to re-discover the map files in the directory if you inserted some or if your calibrated new ones. |
|
Rescale Max |
Set the scale at the maximum scale of calibrated maps under the center of the image. A zoom out which anyway leaves you at the scale 1 of the larger scaled image. |
|
Rescale Min |
Set the scale at the minimum scale of calibrated maps under the center of the image. A zoom in which anyway leaves you at the scale 1 of the most detailed image. |
|
Follow position |
Also settable by pressing <Enter><Down>. When this option is set, the map is moved to track your position. A circle is displayed around the center of the map. The color of the circle depends on the state of the GPS receiver (see distance panel). When your position leaves the circle, the map is re-centered at your position. |
|
Unlock waypoints |
Set this option to avoid insterting or moving waypoints by pressing on the screen. It this option is no set, "Lock waypoints" is displayed and pressing on the screen generates new waypoints. When waypoints are locked, the top line shows the distance, tile, heading to the next waypoint and the total distance and time until the end of the planned track. |
|
Show |
Allows to show/ hide waypoints display on the map and also track on the map. If you are recording your position, your track is displayed on the map (cyan). The waypoints are displayed in blue. |
|
Open waypoints |
Opens a file dialog to open a waypoints file. The state is set to locked waypoints after loading a file. |
|
Save waypoints |
Save currently set waypoints in a waypoints file. This is a text file with the position of the points. The format is the same as the log file but most values are dummies. |
|
New waypoints |
Erase current waypoints and start defining new ones. The state is set to unlocked waypoints. |
You can also use the touchscreen or keys shortcuts to do actions :
|
drag on screen |
Moves the map on the screen, by the same displacement. If you are in "follow position" mode and if your drag moves the current position out of the circle, the center is replaced at your position. If your position is not know (red or orange circle), then movements are free. If you move the map to a center outside the calibrated maps boundaries, the movement stops at the boundary. |
|
long press on the screen (out of a waypoint) |
|
|
long press on the screen (on a waypoint) |
Note : if waypoints are locked, delete and invert are not activated. |
You can use waypoints on the Navigate
panel. The waypoints are locations where you want to go and you can
plan a track by entering several waypoints. You can also save and
retrieve the waypoints on a file. The format of the file is the same
as a log file. Actually, you can even use a log file as a waypoint
track.
When waypoints are placed, the top panel on the screen
displays the total length of the path you have defined. After that,
you can lock the waypoints so that you do not displace them by
touching the screen. On the top display, you see the distance to next
waypoint, the time needed to reach it, the total distance to the end
of the track and the total time.
As you can see, waypoints are
quite useful when you have to plan your trip,e.g. not only find where
you are. So here are a few "how to" which you may find
useful for different case of use.
First check that you are on the
navigate panel and that waypoints are unlocked.
When waypoints are
locked, the Action menu proposes to unlock them (
![]() ),
otherwise, it proposes to lock them when they are unlocked (
),
otherwise, it proposes to lock them when they are unlocked (![]() ).
).
The
simpler is to erase any existing waypoints by selecting Actions/New
Waypoints. It also unlocks the waypoints so that you can enter
new ones.
|
|
|
|
|
|
|
When
your waypoints are defined, you have to save them using Actions>Save
waypoints. The format is the same as a log file, without any
relevant time and speed information :
|
48.580967,-002.555887,
00000.0, 30U, 532755.12, 5380970.75, 050508,
213420.000,-001.0,-001.0, 000.0, 000.0, 00000000.0, 00000.0,
00000.0, 00000 |
If you
want to retrieve them, you use Actions>Load waypoints.
Note
that you reload waypoints when restarting the application and also
that you come back in the same lock mode.
|
If you want to leave the navigation panel without saving waypoints, you are asked a confirmation. |
 |
When you move, it defines a track
that you record using the record command in the Distance
panel. If you want to come back using the same way, just define
another file as log file and open you previous track as a waypoints
track.
Then you must first Actions/Unlock waypoints to
allow modifications and click Invert on the track to
change the way.
Eventually, you save that track to a new waypoints
file and you can set the next waypoint to find you way back.
Do
not forget to lock the waypoints again to avoid any unwanted
modification of your path.
When leaving the application, the
waypoints file name is remembered if they have been saved. When
coming back, the are reloaded and the "next" waypoint is
set again. Because sometimes (too often) CourseLog locks on the GPS
connection, it is useful to leave and re-open the application without
losing your settings.
It is also a way to save your battery : you
log your position, distance to next waypoint, then you can leave
CourseLog, switch off your device. You will retrieve everything when
re-starting.
|
Label |
Content |
Origin |
|
Lat |
Latitude (Deg, min, seconds N/S) |
Directly available when GPS is connected. |
|
Lon |
Longitude (Deg, min, seconds E/W) |
Directly available when GPS is connected. |
|
UTC |
Universal Coordinated Time |
Directly available from GPS reception. Obtained from satellites or from the receiver when it does not receive the satellites. |
|
Log |
File name of the file where to log position points |
Fill it using the file button on the right. Stored in the configuration file. Be careful, log file is never overwritten, always appended. |
|
Alt |
Current altitude above mean sea level in meters. |
GPS fix (GGA sentences). |
|
U |
Total of upwards displacement in meters. |
Sum of traced altitudes positive differences obtained by comparing altitudes between consecutive points. Only available when recording is active. Not very reliable because GPS altitude is not quite accurate. |
|
D |
Total of downwards displacement in meters. |
See above. |
|
Spd, Inst |
Instantaneous speed in km/h |
GPS fix (RMC sentences). GPS receivers estimate your speed as well as your position. |
|
Hdg, Inst |
Instantaneous heading in ° |
GPS fix (RMC sentences). GPS receivers estimate your heading as well as your position (in fact your instantaneous speed vector). |
|
Spd, Avg |
Average speed in km/h |
Calculated between consecutive points. Ratio between distance and time differences. Only available when recording is active. |
|
Hdg, Avg |
Average heading in ° |
Calculated between consecutive points. Uses the direction vector between the 2 last points. Only available when recording is active. |
|
Time |
Total recording time in HH:MM:SS. |
Only available when recording. Computed between the time when recording started and the last recorded point. |
|
Dist |
Total integrated distance (km). |
Only available when recording. Sum of distance between recorded points. Sensitive to the minimum distance option (see below). |
 Minimum
distance, a sensitive option
Minimum
distance, a sensitive optionAs GPS position is not accurate below 100m (worst case), consecutive points are taken into account provided that there is a minimum distance between them. You can specify it using the options button. Under 20m of minimum distance, errors will induce artificial displacements as you are not moving. You can try it, specify a low minimum distance and let the GPS at the same place for 5 minutes, you will see that the distance increases as you don’t move. Therefore, you must specify a distance which is big enough so that summed moves are actual moves and that the error margin is not so big.
Figure here shows that, when going strait on the distance you move corresponds to the distance between “sampled” points as, when you turn, you shorten the distance.
To summarise (for average latitude regions where accuracy is good):
If you are a walker, use 20m or 50m minimum distance so that your moves will not be too much under-sampled and accuracy will not induce a significant error (which accuracy do you actually need?). Especially if you are not going strait on because then your moves are shortened. Switch to pause mode when you stop so that you will not add too many erroneous moves to your actual ones.
If you are running or riding, you go quite strait so you can use 20 m because you move more regularly and you will know your actual distance. Anyway, use the pause mode when you stop.
If you are in a car, the distance can be bigger without significant error (you go far). Use the 100 m or 50 m to have a correct accuracy and no moves when you are stopped.
If you are in a boat, you go strait for long distances and for a long time. Use the large size (500 m). You will have a short enough log and good accuracy.
When the GPS is
operational, define a log file (if you want one) and start recording
pressing the
![]() Record
button.
Record
button.
If you stop for a while,
press the
![]() Pause
button so that your moves are not added and not logged.
Pause
button so that your moves are not added and not logged.
When in pause mode, speed and heading are displayed as well as the time provided by the GPS receiver.
If you want to stop the
application or the GPS receiver, you can press the
![]() Hold
button. Stopping the application during a recording is equivalent to
switch to hold mode.
Hold
button. Stopping the application during a recording is equivalent to
switch to hold mode.
Note that, when the application is restarted in that case, it goes directly to record mode.
If your trip is finished,
press the
![]() Stop
button. Logging is stopped and next recording will reset all values
to 0.
Stop
button. Logging is stopped and next recording will reset all values
to 0.
Log file is intended to be read as a csv file. It contains almost everything you see on the display at a time.
Fields are :
|
Latitude |
Longitude |
Altitude |
UTM zone |
UTM Easting |
UTM Northing |
Date |
Time |
Inst. Speed |
Inst. Heading |
Avg. Speed |
Avg. Heading |
Distance |
Upwards |
Downwards |
Time |
UTM conversion is useful because many maps use that projection. I extracted the formulas from a very good web site : http://www.jstott.org/ Thanks to the author.
If you want to use those
logs with other applications, you can use the converter form of the
CourseLog application :
![]()
This brings the following form :
The
text area at the top provides some help.
The format tries to comply with the specification available here :GPX format. It contains almost all information which are in the log so that you have no color data to select. Converting a log into GPX and you will be able to plot it on many projections using GPS Visualizer online.
You can also do the conversion offline using GPS Babel.
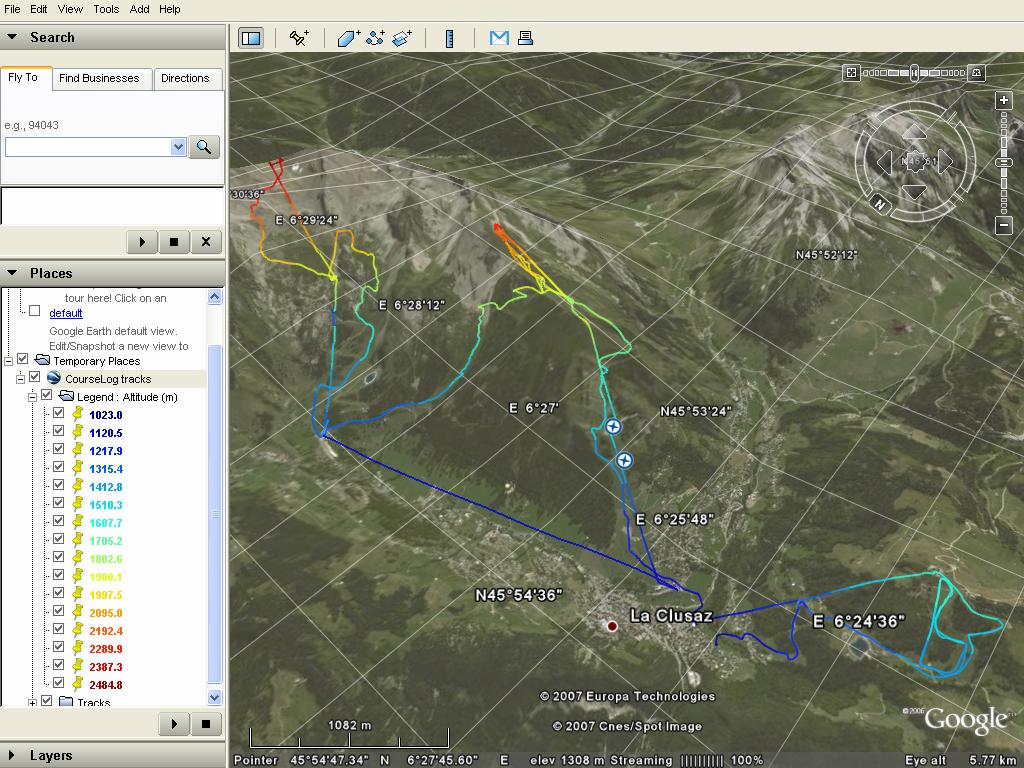
I implemented a simplified (and empirical) version of kml to be used with Google Earth. This consists in generating the points into a serie of track points, each segment having a color corresponding to one of the logged GPS data (altitude, time, speed).
Here is a kind of plot which is generated :
Before downloading, make sure you have read and accepted the license and disclaimer agreement here below.
ARM exe file : To run on a PocketPC2003 and higher with ARM processor (tested on QTEK 9100)
To install on you pocket-pc device, use Ewe149-CAB-PocketPC2003.zip
Windows exe file : To run on a Windows system (Tested on Win XP). This can be used if you have a GPS connected to your PC or also to convert files faster.
To run on your PC, you need to run with the following dll in the directory of your exe file : ewex_registry.dll
EWE file : use this to convert to another platform using EWE application builder.
JNF file : Also useful to determine which files are used to generate the EWE file.
Classes files for use with Jewel : Compressed version of the whole CourseLog Netbeans project directory.
Source zip file : Zipped java sources.
Javadoc zip file : Zipped javadoc HTML. You can browse the CourseLog javadoc online here.
First many thanks to Michael L. BRERETON for making the EWE machine available and freeware.
I did not turn this application into an auto-installer because I did not want to dig into the auto-installer facility he provides but also because you should visit http://www.ewesoft.com to see what great job he achieved.
Thanks also to J. STOTT for very good utilities on projections (http://www.jstott.org/).
Thanks to the GPX tools providers (see GPX conversion section).
Many problems probably. The major one is that, when the GPS gets disconnected, it is difficult to reconnect without restarting the application. Maybe I did not use properly the serial port connections. Anyway, I tried to lake it as robust as possible. Now, you can switch off your application and/ or your GPS device and restart the GPS, then the application, and you will get a continued log.
If you have problems, hints, proposals, anything, let me know at this address mailto:courselog@free.fr.
Some Italian fellow already did something quite nice : MyGPS. You can compare, of course I use mine!
Maybe a version using my native language (French).
There is a new VM (EVE) which could help making CourseLogV2 more stable and also available on other platforms (symbian?).
Your proposals are welcomed.
IMPORTANT - READ CAREFULLY
THE ACCOMPANYING PROGRAM IS PROVIDED
UNDER THE TERMS OF THIS COMMON PUBLIC
LICENSE ("AGREEMENT").
ANY USE, REPRODUCTION OR DISTRIBUTION OF THE PROGRAM
CONSTITUTES
RECIPIENT'S ACCEPTANCE OF THIS AGREEMENT.
1. DEFINITIONS
"Contribution" means:
a) in the case of the initial
Contributor, the initial code and
documentation distributed under
this Agreement, and
b) in the case of each subsequent Contributor:
i) changes to the Program, and
ii) additions to the Program;
where such changes and/or additions
to the Program originate from and are
distributed by that
particular Contributor. A Contribution 'originates' from
a
Contributor if it was added to the Program by such Contributor
itself or anyone
acting on such Contributor's behalf.
Contributions do not include additions to
the Program which: (i)
are separate modules of software distributed in
conjunction with
the Program under their own license agreement, and (ii) are
not
derivative works of the Program.
"Contributor" means any person or entity that distributes the Program.
"Licensed Patents " mean
patent claims licensable by a Contributor which are
necessarily
infringed by the use or sale of its Contribution alone or
when
combined with the Program.
"Program" means the Contributions distributed in accordance with this Agreement.
"Recipient" means anyone
who receives the Program under this Agreement,
including all
Contributors.
2. GRANT OF RIGHTS
a) Subject to the terms of this
Agreement, each Contributor hereby grants
Recipient a
non-exclusive, worldwide, royalty-free copyright license
to
reproduce, prepare derivative works of, publicly display,
publicly perform,
distribute and sublicense the Contribution of
such Contributor, if any, and such
derivative works, in source
code and object code form.
b) Subject to the terms of this
Agreement, each Contributor hereby grants
Recipient a
non-exclusive, worldwide, royalty-free patent license under
Licensed
Patents to make, use, sell, offer to sell, import and
otherwise transfer the
Contribution of such Contributor, if any,
in source code and object code form.
This patent license shall
apply to the combination of the Contribution and the
Program if,
at the time the Contribution is added by the Contributor,
such
addition of the Contribution causes such combination to be
covered by the
Licensed Patents. The patent license shall not
apply to any other combinations
which include the Contribution. No
hardware per se is licensed hereunder.
c) Recipient understands that
although each Contributor grants the licenses
to its Contributions
set forth herein, no assurances are provided by any
Contributor
that the Program does not infringe the patent or other
intellectual
property rights of any other entity. Each Contributor
disclaims any liability to
Recipient for claims brought by any
other entity based on infringement of
intellectual property rights
or otherwise. As a condition to exercising the
rights and licenses
granted hereunder, each Recipient hereby assumes sole
responsibility
to secure any other intellectual property rights needed, if any.
For
example, if a third party patent license is required to allow
Recipient to
distribute the Program, it is Recipient's
responsibility to acquire that license
before distributing the
Program.
d) Each Contributor represents that
to its knowledge it has sufficient
copyright rights in its
Contribution, if any, to grant the copyright license set
forth in
this Agreement.
3. REQUIREMENTS
A Contributor may choose to
distribute the Program in object code form under its
own license
agreement, provided that:
a) it complies with the terms and conditions of this Agreement; and
b) its license agreement:
i) effectively disclaims on behalf of
all Contributors all warranties and
conditions, express and
implied, including warranties or conditions of title
and
non-infringement, and implied warranties or conditions of
merchantability and
fitness for a particular purpose;
ii) effectively excludes on behalf of
all Contributors all liability for
damages, including direct,
indirect, special, incidental and consequential
damages, such as
lost profits;
iii) states that any provisions which
differ from this Agreement are offered
by that Contributor alone
and not by any other party; and
iv) states that source code for the
Program is available from such
Contributor, and informs licensees
how to obtain it in a reasonable manner on or
through a medium
customarily used for software exchange.
When the Program is made available in source code form:
a) it must be made available under this Agreement; and
b) a copy of this Agreement must be included with each copy of the Program.
Contributors may not remove or alter
any copyright notices contained within the
Program.
Each Contributor must identify itself
as the originator of its Contribution, if
any, in a manner that
reasonably allows subsequent Recipients to identify the
originator
of the Contribution.
4. COMMERCIAL DISTRIBUTION
Commercial distributors of software
may accept certain responsibilities with
respect to end users,
business partners and the like. While this license is
intended to
facilitate the commercial use of the Program, the Contributor
who
includes the Program in a commercial product offering should
do so in a manner
which does not create potential liability for
other Contributors. Therefore, if
a Contributor includes the
Program in a commercial product offering, such
Contributor
("Commercial Contributor") hereby agrees to defend and
indemnify
every other Contributor ("Indemnified Contributor")
against any losses, damages
and costs (collectively "Losses")
arising from claims, lawsuits and other legal
actions brought by a
third party against the Indemnified Contributor to the
extent
caused by the acts or omissions of such Commercial Contributor
in
connection with its distribution of the Program in a commercial
product
offering. The obligations in this section do not apply to
any claims or Losses
relating to any actual or alleged
intellectual property infringement. In order
to qualify, an
Indemnified Contributor must: a) promptly notify the
Commercial
Contributor in writing of such claim, and b) allow the
Commercial Contributor to
control, and cooperate with the
Commercial Contributor in, the defense and any
related settlement
negotiations. The Indemnified Contributor may participate in
any
such claim at its own expense.
For example, a Contributor might
include the Program in a commercial product
offering, Product X.
That Contributor is then a Commercial Contributor. If that
Commercial
Contributor then makes performance claims, or offers
warranties
related to Product X, those performance claims and
warranties are such
Commercial Contributor's responsibility alone.
Under this section, the
Commercial Contributor would have to
defend claims against the other
Contributors related to those
performance claims and warranties, and if a court
requires any
other Contributor to pay any damages as a result, the
Commercial
Contributor must pay those damages.
5. NO WARRANTY
EXCEPT AS EXPRESSLY SET FORTH IN THIS
AGREEMENT, THE PROGRAM IS PROVIDED ON AN
"AS IS" BASIS,
WITHOUT WARRANTIES OR CONDITIONS OF ANY KIND, EITHER EXPRESS
OR
IMPLIED INCLUDING, WITHOUT LIMITATION, ANY WARRANTIES OR
CONDITIONS OF TITLE,
NON-INFRINGEMENT, MERCHANTABILITY OR FITNESS
FOR A PARTICULAR PURPOSE. Each
Recipient is solely responsible for
determining the appropriateness of using and
distributing the
Program and assumes all risks associated with its exercise of
rights
under this Agreement, including but not limited to the risks and
costs of
program errors, compliance with applicable laws, damage
to or loss of data,
programs or equipment, and unavailability or
interruption of operations.
6. DISCLAIMER OF LIABILITY
EXCEPT AS EXPRESSLY SET FORTH IN THIS
AGREEMENT, NEITHER RECIPIENT NOR ANY
CONTRIBUTORS SHALL HAVE ANY
LIABILITY FOR ANY DIRECT, INDIRECT, INCIDENTAL,
SPECIAL,
EXEMPLARY, OR CONSEQUENTIAL DAMAGES (INCLUDING WITHOUT LIMITATION
LOST
PROFITS), HOWEVER CAUSED AND ON ANY THEORY OF LIABILITY,
WHETHER IN CONTRACT,
STRICT LIABILITY, OR TORT (INCLUDING
NEGLIGENCE OR OTHERWISE) ARISING IN ANY WAY
OUT OF THE USE OR
DISTRIBUTION OF THE PROGRAM OR THE EXERCISE OF ANY RIGHTS
GRANTED
HEREUNDER, EVEN IF ADVISED OF THE POSSIBILITY OF SUCH DAMAGES.
7. GENERAL
If any provision of this Agreement is
invalid or unenforceable under applicable
law, it shall not affect
the validity or enforceability of the remainder of the
terms of
this Agreement, and without further action by the parties hereto,
such
provision shall be reformed to the minimum extent necessary
to make such
provision valid and enforceable.
If Recipient institutes patent
litigation against a Contributor with respect to
a patent
applicable to software (including a cross-claim or counterclaim in
a
lawsuit), then any patent licenses granted by that Contributor
to such Recipient
under this Agreement shall terminate as of the
date such litigation is filed. In
addition, if Recipient
institutes patent litigation against any entity
(including a
cross-claim or counterclaim in a lawsuit) alleging that the
Program
itself (excluding combinations of the Program with other
software or hardware)
infringes such Recipient's patent(s), then
such Recipient's rights granted under
Section 2(b) shall terminate
as of the date such litigation is filed.
All Recipient's rights under this
Agreement shall terminate if it fails to
comply with any of the
material terms or conditions of this Agreement and does
not cure
such failure in a reasonable period of time after becoming aware
of
such non compliance. If all Recipient's rights under this
Agreement terminate,
Recipient agrees to cease use and
distribution of the Program as soon as
reasonably practicable.
However, Recipient's obligations under this Agreement
and any
licenses granted by Recipient relating to the Program shall continue
and
survive.
Everyone is permitted to copy and
distribute copies of this Agreement, but in
order to avoid
inconsistency the Agreement is copyrighted and may only be
modified
in the following manner. The Agreement Steward reserves the right
to
publish new versions (including revisions) of this Agreement
from time to time.
No one other than the Agreement Steward has the
right to modify this Agreement.
IBM is the initial Agreement
Steward. IBM may assign the responsibility to serve
as the
Agreement Steward to a suitable separate entity. Each new version of
the
Agreement will be given a distinguishing version number. The
Program (including
Contributions) may always be distributed
subject to the version of the Agreement
under which it was
received. In addition, after a new version of the Agreement
is
published, Contributor may elect to distribute the Program (including
its
Contributions) under the new version. Except as expressly
stated in Sections
2(a) and 2(b) above, Recipient receives no
rights or licenses to the
intellectual property of any Contributor
under this Agreement, whether
expressly, by implication, estoppel
or otherwise. All rights in the Program not
expressly granted
under this Agreement are reserved.
This Agreement is governed by the
laws of the State of New York and the
intellectual property laws
of the United States of America. No party to this
Agreement will
bring a legal action under this Agreement more than one year
after
the cause of action arose. Each party waives its rights to a jury
trial in
any resulting litigation.


 Shows
a contextual menu which allows to:
Shows
a contextual menu which allows to: